Showing posts with label Pinterest. Show all posts

Wednesday, July 29, 2015

An Old Soul Deserves an Old Mirror

Ok, so its pretty much been established that I am an old soul, or at least a vintagey-type of person (no old age cracks please!). My entire life, I have always had a passion for thick moldings rimming a room, peeling cornices revealing generations of paint choices, old wavy windows that slightly blur the view outside, doors with intricate details, and of course, colorful and painstakingly-made stained glass windows. Something about flinging open a pair of heavy, old wooden pocket doors that take you from the long, symmetrical hallway into a room with high coffered ceilings, creaky wood floors, a fire roaring in the fireplace, just makes me feel perfectly at peace in the world.

So, one of my goals with my new-old home was to try my hardest to bring only vintage, authentic pieces into it. Items that have a history and simply make me happy (while I profess to be authentic, its not fully true for me when it comes to toilets and plumbing, appliances, or A/C, though!!). As you know, I have been scouring flea markets, antique and salvage shops, Craigslist, eBay, etc… (side note: I am currently waiting to hear back from a fellow Craigslister to see if he accepts my offer on a vintage Victorian fireplace screen, it's really pretty!) but I can't afford all vintage so in some cases, I have to either accept it or alter it. In this case, beautiful antique mirrors are a small fortune so I found the following gem in a little thrift shop in Ocala (via Facebook). It's old but more like 50s' old, not early 1900's old but that's no problem for me!

I love the lines of this mirror but would love
for it to have an "old mirror" look and not be gold
and thanks to Pinterest, I can do that!

First I removed the mirror from the frame.
Look at the "wonkiness" of this glass cutting!
Do you also like the sneak-peek of my dining room ceiling?
In my opinion, its swoon-worthy!
I decided to paint the frame a matte black first.
Ahhhhh . . . much better but not there yet.
I wanted the frame of the mirror to have a silver-leaf look
and this little bottle was able to do the trick
(and two more frames!).
Thankfully, I wanted the mirror to have that streaky silver-look or
at least that's what I told myself.
I also wanted parts of the black and gold to "peek" through.

I also very lightly sanded off some of the silver
and in a few spots, some of the black to let the
layers of color shine through.
I decided I wanted the silver toned down just a bit.
I very daintily (because those who know me know how dainty I can be)
dry painted the deep nooks and crannies
of this mirror with the antique wax and then wiped 98% of it off.
I love it!
Next step is to "age" the mirror.
In order to proceed with the aging,
I needed to remove the outer layer of paint.
I sprayed on the paint remover and left it for about 30 minutes. 
The first coat didn't work that great so I sprayed
another layer of paint stripper and waited.
The second time worked like a charm and was a bit fun
to peel! Then I sprayed muriatic acid to make those
old dots and it went everywhere and looked like crap!
No pictures available because I was busy cursing.
I then stripped all the mirror and started over again
because now basically I have a piece of glass!
Gee, thanks Pinterest!
So I ran to my local Ace Hardware to buy some
of the Mirror Effect spray paint but they didn't have it.
I then headed to my home-away-from-home, Home Depot,
and bought a can (I didn't know it at the time but that was a mistake!).
I did like the way the spray paint layered the layers of silver.
HOWEVER this is after another trip to Home Depot and
2 more cans of mirror paint because the muriatic acid
was a F.A.I.L again. Cue more cursing and now
we are on day 3! I finally decided to just man-handle
the paint and rub away a bit. I added a layer of black spray paint
over the mirror paint and finally,  I am somewhat happy.
I put the mirror back in the frame and voila!
It's not what I started out going for but it's not too shabby
or actually, its just the right level of shabby! 

After three days, three cans of Mirror Effect Spray Paint, several minor burns on my hands from the acid, the investment in a pair of heavy rubber gloves, and my time, I probably could have flown to Paris and found a vintage mirror but I am very happy with the results. Knowing me, I will probably pull it down in the near-future to make some adjustments to it but for now it will hang. Wanting to show off my handiwork, I called my youngest in to admire my oh-so pretty mirror and in a teenage girl way, she mumbled something about it being ok. She then proceeded to ask me if I planned on cleaning the mirror. Hand to head! Ahhhhh! Guess I'll need to keep my day job. I head to the kitchen for a bottle glass of wine. Put a fork in this one because I am done! I have another super fun, and much easier, project to share next but that is for another post!

Kristin


Wednesday, August 29, 2012

Ribbon Dilemma . . .

Ok, so while making the conversion from playroom to craft room, I came across a HUGE box of ribbons. Actually, make that a couple of boxes. Every now and then, while I was out shopping, I would come across big ribbon sales and stock up. The problem was, I kept the ribbons in boxes under the bed, never to be seen or ever used - what's the point?

So I decided I needed a better ribbon holder (yes, I do realize that if that is my biggest problem of my week, I am SUPER lucky!). I headed to my handy dandy Pinterest and started looking.

This was clever and economical but not pretty.
This was really smart but I am fussy and don't want my ribbons squeezed!
(Take that whatever way you want!)
I thought this was the best, and prettiest solution, until I realized it would be a pain to have to remove the entire rod every time I wanted a ribbon. Then you would have to pull every thing off. Too time consuming for me!
Then I saw this, and knew I had a winner!
Thanks Martha, you saved me once again.
Now the copper in these gutters is quite beautiful but would not go with my new color scheme. Sooooo, I took myself to the local Home Depot and perused the gutter aisle with ribbon in hand. I wanted something pretty but practical. I also wanted to make sure the ribbon would fit in the gutter and this is what I came up with -


This, as seen on a previous post, holds the ribbons that are too large to fit in
the gutters ribbon holder.
The gutters came in 10' sections and only cost about $5-$10 each. I had originally bought 3 sections because I thought I wanted a lot more storage but decided to go with only 3 rows, therefore only needed 20' feet. I cut them down with my circular saw and added the end caps, which I think were about $6 for a set of 2. I just screwed them to the wall and added my ribbon. I absolutely adore it! I just walk over to see what I need, grab it and then make sure to put it back when I am done. Seeing everything helps me make sure it all gets used and that I don't buy ribbon I already have. I am notorious for being consistent with my taste and buying the same item more than once but not realizing it, of course that problem will not be happening in September!


So if you are looking for a ribbon holder, I hope this post gives you lots of great ideas for what would work best for you. All the original links can be found on Pinterest, just search for ribbon holders.

Off to finish organizing my hall closet but that is for another post!

Monday, August 13, 2012

What Do I Smell - Fall??


Ok, let's be honest. I live in Florida and it is freaking hot right now. I know it is hot around the rest of the country but remember, in Florida, it's the humidity that will get ya!!

So in order for me to survive what I deem - THE most annoying month of the year (my apologies to those born this month, Presley, I mean you!) - I have to think ahead to beautiful red, orange and yellow leaves (not palm fronds), crisp, cool air (not your clothes sticking to you the minute you walk out the door), and pumpkin picking (not mosquito swatting). The best way for this Florida girl to do that is to turn her house in a beautiful Fall setting. Please bear in mind, I have a retail background so getting an early jump on the holidays is something that is in my blood.

That's why, this Sunday, August 19, the day before school starts, my husband will be bringing all the Fall boxes out of storage and I will begin decorating!! Can't wait! Can't wait! Can't wait!! (TMI Note: I would totally be jumping up and down if I was wearing a workout bra right now!) I would actually start sooner but we are having company this Saturday and I didn't want to look too silly!!

In addition to all my gorgeous decorations (at least I think they are), I also plan to make a couple of items that have been on my radar for sometime. Again, I defer to Pinterest (all original posts can be found on my Pinterest account):


1. I plan on reworking my front doors (lucky me, I have 2) and making some great wreaths. Usually I use these beaded-wreathy things I bought at Home Goods years ago and the wooden beads keep falling off and it has a funny odor. Real pleasant when you knock on my door. I also have a falling down chalkboard. It's a real eyesore and needs a total revamping.


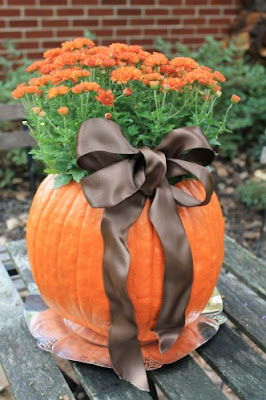
2. Back to the front door area, I think something like this would be nice. Of course living in Florida, we can't carve our pumpkins until the night before Halloween or they will be filled with mildew (eeewww!). However, wouldn't a fake pumpkin be great? You would probably have to remove the mum to water it or maybe drill holes in the pumpkin but I am going to give it a shot. Stay tuned on this!


3. I have just bought a set of these bad boys, they light up with batteries!! They are due to arrive later this week. Not sure how they will look but hoping they will look as good in person, as they do in my head!


4. You have seen this picture before and it IS going to happen. I was going to have my Go To Guy do it for me but then I had to have a bunch of wood siding on my house replaced by him and that took care of any budget I had! I can do this myself, but it is just a matter of me getting the wood because I don't think I have much laying around my house. Maybe if I cleaned out the garage, I might find some. Needless to say, one way or another, this is happening!!!

Don't even get me started on Fall foods. I have a whole board on Pinterest just for that!! So I am off to finish organizing my craft room so I feel crafty enough to get my craft on but that is for another post!

Wednesday, August 8, 2012

Showing Team Spirit!


Ok, so my oldest daughter, Caitlin, made the Devilettes Dance Team at her high school (she is one of only 2 Freshmen on the squad!!). She had a week of camp at the end of July and is currently going through her second camp - and more sore muscles!!

All week, the dancers worked out hard and enjoyed healthy snacks, so we asked if it would be ok to give the girls a treat at the end of the week and her coach was totally on board.

Caitlin loves cupcakes so we picked up some at our local bakery and asked them to put green and white swirled icing on the top. If you are looking for a blog where they grow their own wheat and then harvest it to make their own food - move on, this blog is not for you!! No fancy cupcake recipe here!!

We wanted to give each girl a cupcake and needed a safe, and inexpensive, carrier. So I go to my handy dandy Pinterest and found the perfect case - a clear plastic cup with a cellophane bag. We added the mascot, a Green Devil, printed out on card stock and came up with this -


We think they turned out great and the sweet treat was appreciated!! Off to finish another unfinished project, but that's for another post!


Tuesday, August 7, 2012

I'm Getting Hungry!

Ok, so I have been super busy trying to get my house as organized as possible before school starts. I truly believe when I as a mommy and the house are both organized, our home runs smoother, much smoother!

So when I found myself glued to the Olympics (not sure why but our family has been addicted this year), I wanted to also be productive. Now that I have "discovered" Pinterest, I no longer feel the need to buy a lot of magazines (still get a few though) and pull ideas and recipes from them.

This is my stack! It usually is a little neater but this is what I started with when I pulled all the folders and threw them in a basket. 
I decided to go through the stack and recycle all the recipes I no longer wanted. Usually on recipes I try, I will write a note and the date and whether it was liked or not. I do this in all our cookbooks, too. One, so I won't repeat recipes no one liked and two, so when the girls are older and receive the cookbooks, they can see recipes they liked and ones they helped me cook. SO I gathered my gagillion recipes and started googling them. There are a lot of variations out there so I made sure to find the exact one.  Out of ALL the recipes I hunted for, only a handful of them I couldn't fine on-line so I kept them.

Now I have (almost) all the recipes I want on Pinterest. God help me if Pinterest ever closes or goes out-of-business!!  Looking at all these recipes have really gotten me interested in cooking and baking again. Living in Florida during the summer, I lose all desire to cook because it is just too hot!


Getting smaller.
So I have one more folder to make my way through - Desserts - and women's water polo is on. Go Team USA! Beat those Aussies! If you want to see any of the recipes I pinned, please go to my Pinterest page. Can't wait to start making some food but that is for another post!


Wednesday, June 27, 2012

Cross This Off the List . . .

Ok, so I have been dying to get more organized. I swear, I take one step forward, and slide and fall two steps six steps back. This summer is the year of MISSION ORGANIZATION (read that with a deep, drawl-ing, echoey voice - sounds good, right? Didn't I say this in January too, though??).

Go to my Pinterest account for the original source.
So I have been wanting to do this forever (of course I found it on Pinterest in fact, one of the very first things I pinned last summer when I was told about this Godsend by my friend Beth. I then proceeded to waste the next 3 days of my life getting everything organized (ha, ha - my Pinterest is more organized than my house!) and pinning everything I loved!!

I love the idea of these storage boxes. We have a lot of guests and items are usually left behind. I try to keep them in a certain spot but then they get moved, shoved, borrowed, and so on! I also have the random item to return to the store or donate and again, they just get randomly placed wherever. I was going to put them in the hall closet but since I don't usually open it every time I leave the house, I thought this location would be better. This is the door from the house into the garage. I pass by here a lot more so I will see what's in the boxes on a more regular basis (no so out-of-sight-out-of-mind). So here's my solution -


I wanted the containers to be see-through because I would not always remember that I had something to return/donate/etc. I already had the shelves as you can see by below (quickly look away and scroll down if you have an adverse reaction to clutter/crap/junk/etc... because this will send you over the edge!).


But now it is all gone, most of the pink storage to my niece Presley as we no longer have any pink in our house anywhere - a thought that made my husband (and only male in the entire house) very sad. So again, here is the finished project:


I was going to print out fun labels or paint chalkboard squares but then I was perusing another blog site (and apologies because I could not find the original source) but I saw these Martha Stewart peel-and-stick chalkboard labels. I was overwhelmed! I was overjoyed! I was over the jank labels I was going to make! I immediately grabbed my car keys and handbag and headed to Staples (appears to be the only local place I could buy them). Yes, Tropical Storm Debby was on it's way but that didn't matter to me!

Score!!
Again, me being me, I ended up buying 2 sets of the larger labels (6 labels 3 3/4"x5 3/16", I think around $5.99 each) and 2 smaller sets (12 labels 2 1/2"x 3 3/4", I think same price of $5.99). I can't wait to start labeling everything! Trust me, you will see plenty more of these posts coming to a blog near you! I had chalk at my house but had heard about these new markers that write like chalk. I couldn't find any sets of different colors (Michaels was out and I didn't feel like going to Jo-Ann's because you know, Tropical Storm and everything) so I found this one white marker in the Bridal section at Michaels.

Another score!
I then, giddy as a school girl, head home and actually finished my project. Here are the categories I came up with:

Left behind by guests or borrowed by us.

Being a former retail employee for years, I never use to return items to stores.
Now that I am on an organizing kick, I am working hard at returning something
that won't work for the reason I bought it.
(In fact, just cleaned my closet yesterday and am donating 3 items with tags still on them - ugh!) 

This will be used for any odd item - return library books,  take to be repaired, whatever
we can think of. We can just write it on the chalkboard label and wipe it when done.
I just love it and actually just took a load down to the Return to Owners box. I think I might add the person's name to the label to help remind me. This will work great and create a spot for all those random, transitional items. Now I just have to train my family but that is for another post!